
Deadlift Setup in 3: Win the Lift Before the Bar Leaves the Floor
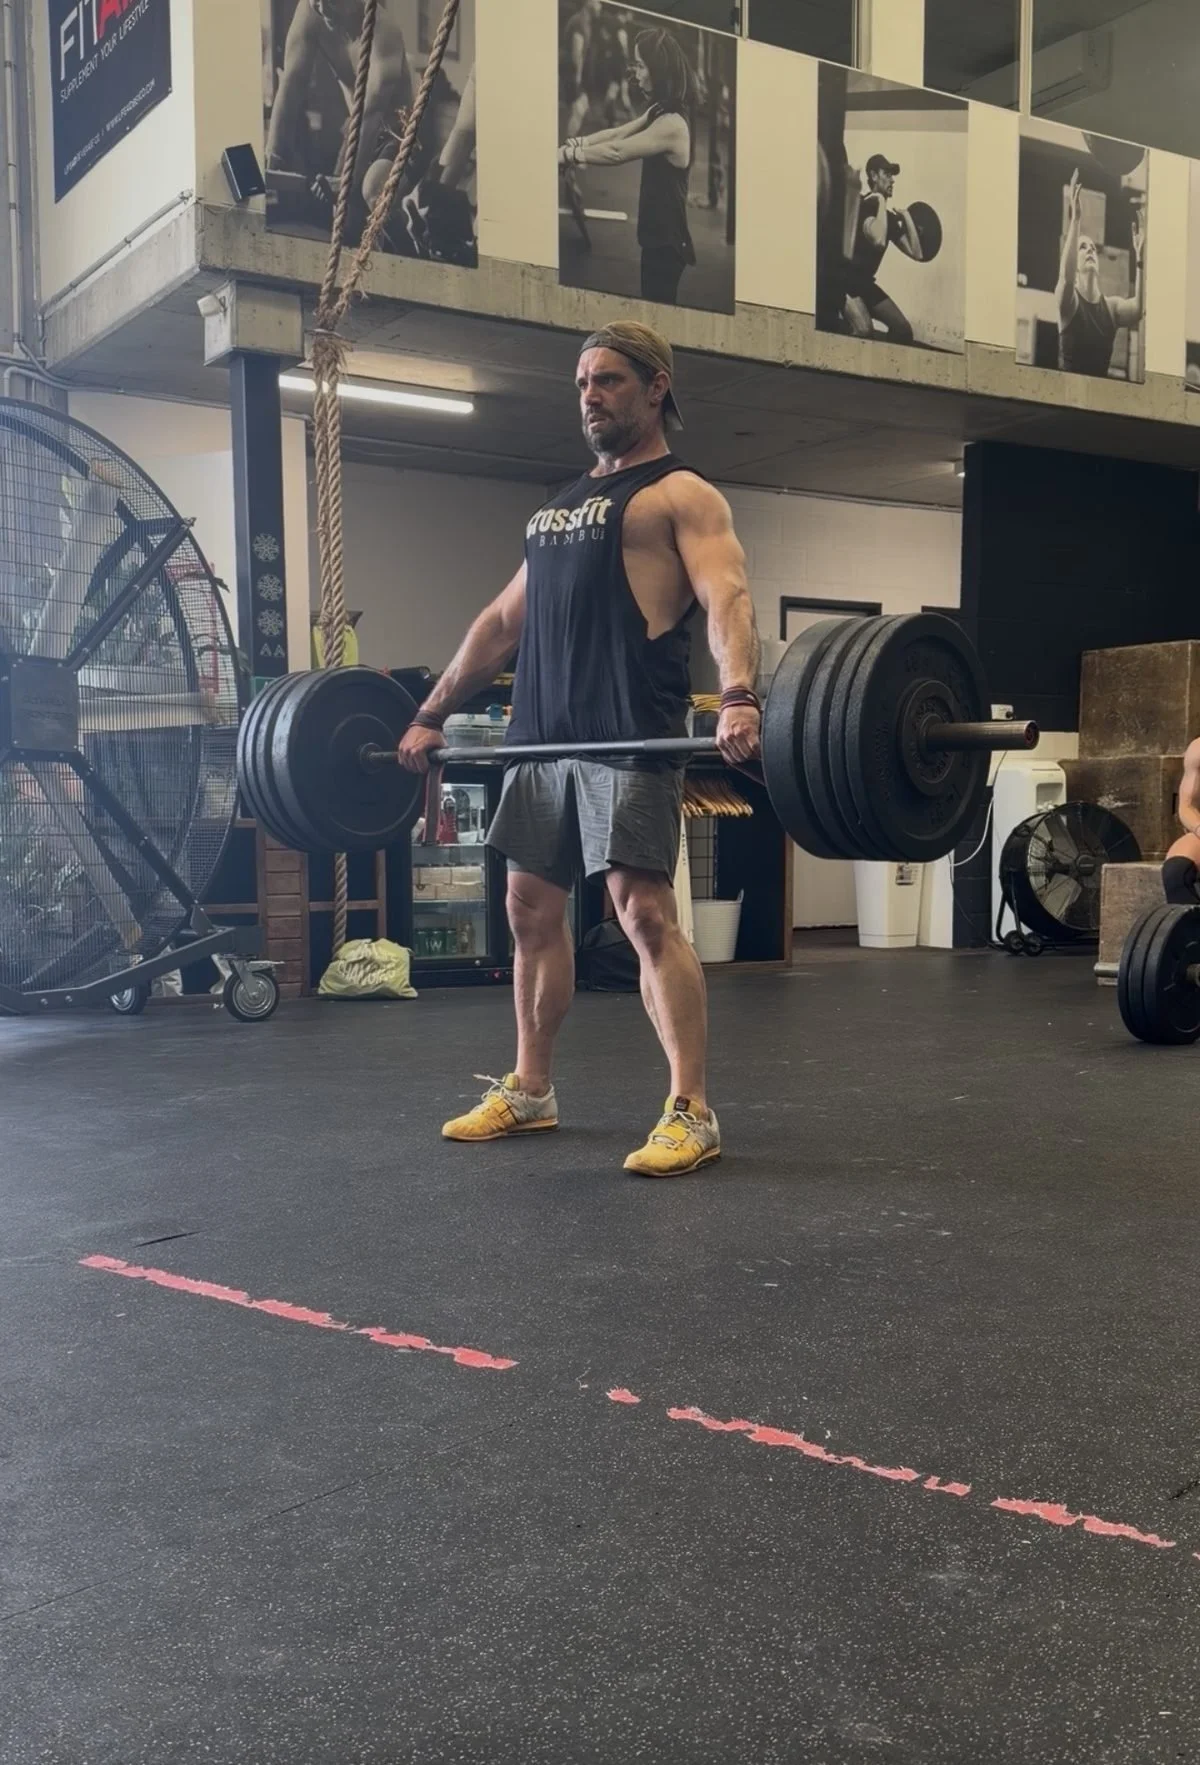
A good deadlift is decided before the bar leaves the floor
Most ugly or missed deadlifts are lost in the two seconds before the pull, not during it. If the bar starts in the wrong spot, or you yank before you're tight, the rest of the rep is spent fixing the mistake.
At Accelerate Strength we check three things on every rep, whether it's your first session or you're chasing a PR:
- Bar over the middle of your foot.
- Hips set so your shins meet the bar without rolling it away.
- Slack pulled out and trunk braced before the bar moves.
This guide walks through each check, the physics behind why it works, the setup faults we see most on the floor, how to pick the right deadlift for your goals, and what to do if your back is talking to you. Want it all in one place? Grab the free Deadlift Setup Playbook at the end.
Free download: the 15-page Deadlift Setup Playbook (checks, fault finder, 6-week block, niggle traffic light). Download the PDF
Watch first
Two short videos worth ten minutes before your next pull. Watch them side-on to the lifter, the same way we coach you.
- The Ultimate Deadlift Masterclass (Step-by-Step Setup). A full walkthrough of the setup. Watch where the bar sits over the foot before the lifter bends down, and how still it stays as they get into position.
- Second video: the setup in action. Watch the pause between grabbing the bar and the bar moving. That pause is where the rep is won.
While you watch, check the lifter against the three setup checks below. If you can spot all three, you'll start feeling them in your own pull.
Check 1: Bar over the middle of your foot
The bar starts over your mid-foot, roughly over your shoelaces and about 2 to 5 cm from your shins. Your mid-foot is your balance point, so a bar that starts there can travel straight up instead of swinging back into you.
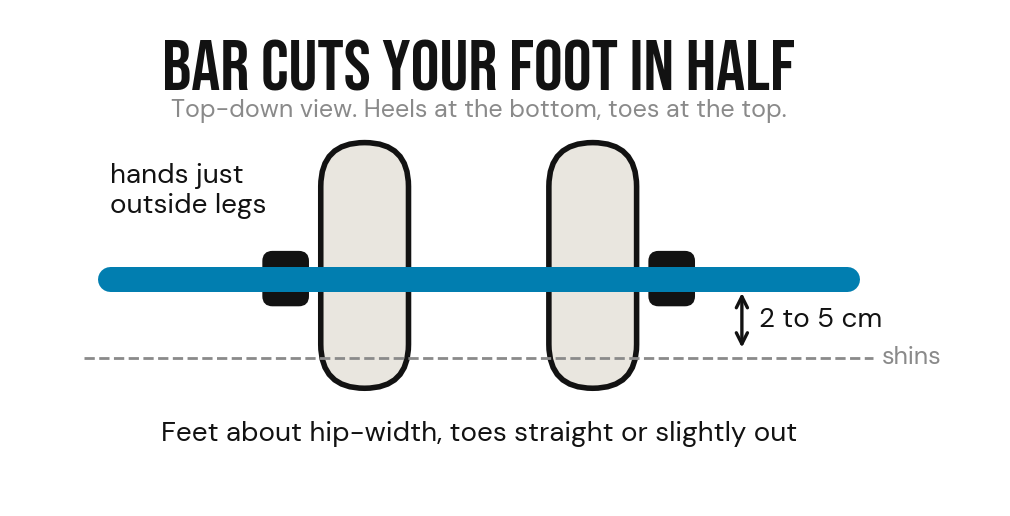
How to set it:
- Feet about hip-width, toes straight or turned out slightly. A good test: where would you put your feet for a vertical jump? Start there.
- Walk your feet to the bar, not the bar to your feet. Look down: the bar should cut your foot roughly in half.
- Hands just outside your legs. Your arms should brush your thighs without your knees pushing them out. Wider than that just adds range.
Grip: double overhand for as long as your grip holds, then hook grip or straps. Mixed grip works, but keep the under-hand arm dead straight, since a bent elbow on the supinated side is how biceps tears happen.
Check 2: Hips set so your shins meet the bar
Once your hands are on the bar, bring your shins forward until they touch it, without rolling the bar forward. If the bar moves, you've come in too far and lost check 1.
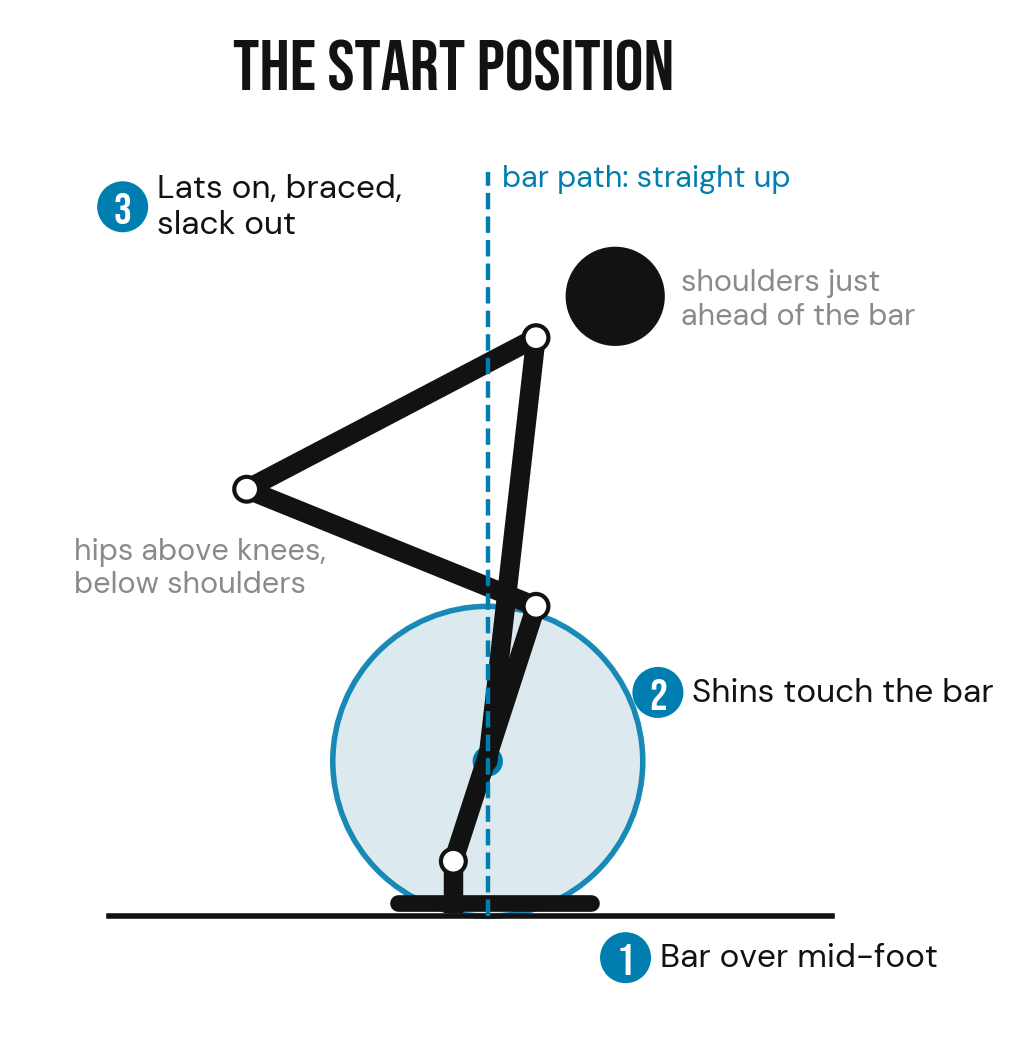
What good looks like from the side:
- Shoulders slightly in front of the bar. Squat University's cue is "rear delt over the bar", which tends to leave your arms close to vertical.
- Hips higher than your knees, lower than your shoulders. Exact height depends on your limb lengths. Longer arms usually mean higher hips; shorter arms, lower hips.
- Back flat and long, neck in line with your torso, eyes a couple of metres in front of you on the floor.
Don't copy a picture. Copy the checkpoints. Two lifters with good setups can look quite different because their femurs, torsos and arms are different lengths.
Check 3: Pull the slack out and brace before you lift
The deadlift has no lowering phase before the first rep, so you have to create tension on purpose. Yank the bar while you're loose and your hips shoot up, your chest drops, and your back does the lifting.
The sequence, every rep:
- Breathe and brace. Big breath into your belly and sides, then tighten like you're about to take a punch.
- Lats on. Think "bend the bar around your shins" or "squeeze oranges in your armpits". Arms stay long and straight; they're hooks, not levers.
- Pull the slack out. Pull up just enough to hear the bar click against the plates and feel your whole body go tight. The bar hasn't left the floor yet.
- Push the floor away. Drive through your whole foot. Hips and chest rise together until the bar passes your knees.
- Finish with your hips. Once the bar is past your knees, drive your hips through to stand tall. No leaning back.
- Lower with control. Hips back first until the bar passes your knees, then bend the knees. You'll land back in a good start position for the next rep.
A handy mental model from Squat University: squat it to the knee, then hinge it to lockout.
Why setup matters: the bar is on a lever
The further the bar sits in front of your mid-foot, the longer the lever your hips and lower back have to work against. Every centimetre of drift adds load you have to overcome before the bar even gets to your knees.
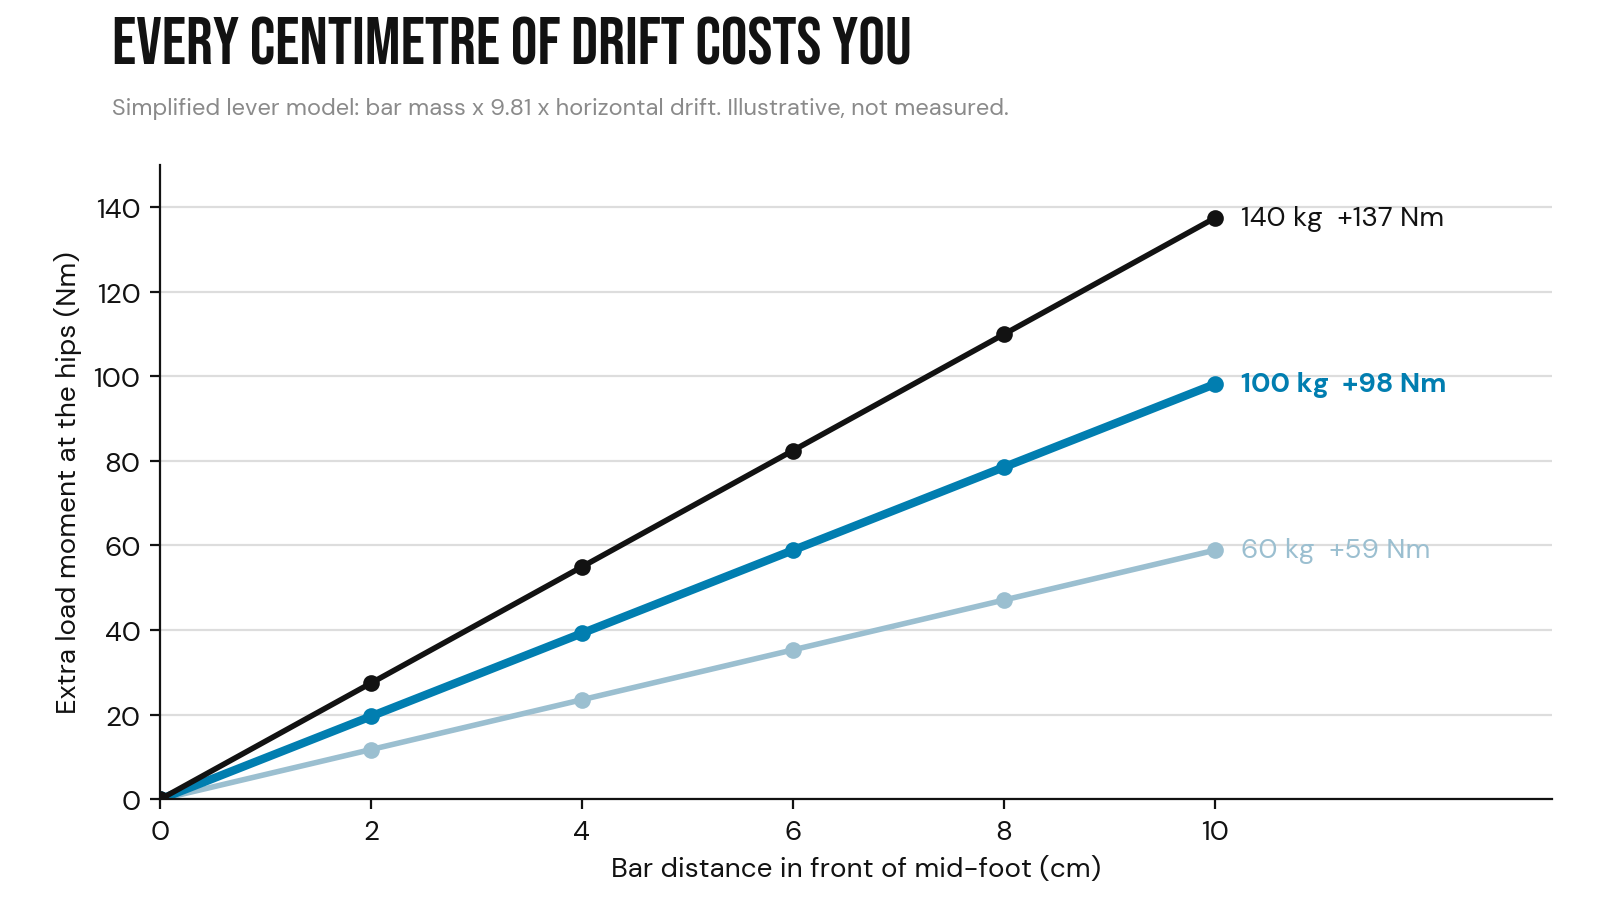
Simplified lever model: bar mass x 9.81 m/s² x horizontal drift. Illustrative, not measured data.
The maths is simple: in this model, a 100 kg bar that starts 10 cm too far forward adds roughly 98 Nm to what your hips and back have to resist (100 kg x 9.81 x 0.10 m). Compare that with the lat and shoulder-blade tweaks lifters obsess over, which Stronger by Science estimates cut hip and lower back demand by only about 3 to 5%. Where the bar starts is the bigger lever.
Treat these numbers as a worked example, not lab data. Real lifters rebalance as the bar drifts, which usually makes the true cost a bit higher, not lower. That rebalancing is also why a forward bar pulls you onto your toes, rounds your upper back, and drags the bar back into your shins on the way up.
The six setup faults we see most, and the fix
Almost every messy deadlift traces back to one of these. Find yours, then use the fix for a few weeks at a weight you can own.
| What you see | Why it happens | Quick fix |
|---|---|---|
| Hips shoot up first, chest drops | Pulled before you were tight | Pull the slack out, count one second, then push the floor away |
| Bar swings out, then back into the shins | Bar started over the toes | Walk your feet in until the bar cuts your foot in half |
| Bar rolled forward during setup | Shins came to the bar too hard | Bring shins to the bar, not the bar to the shins. Reset if it moves |
| Upper back rounds as the bar breaks | Lats off, arms loose | "Bend the bar around your shins" before it leaves the floor |
| Elbows bend or biceps pull | Trying to lift with the arms | Arms are hooks. Squeeze the grip, keep elbows locked |
| Leaning back or hitching at the top | Finishing with the back, not the hips | Stand tall and squeeze the glutes. Hips through, ribs down |
If the same fault keeps showing up, drop the load 10 to 20% and film a set side-on. Most faults disappear once the weight stops being a fight.
Choosing your deadlift
There's no single "correct" deadlift. The same three setup checks apply to all of these; what changes is where the work lands.
| Variation | Where the work lands | Pick it when | Typical reps |
|---|---|---|---|
| Conventional | Hamstrings, glutes, spinal erectors | You want the classic total-body strength builder | 1 to 6 for strength |
| Sumo | Glutes, quads, adductors, less lower back | Shorter arms, longer torso, or you want a more upright pull | 1 to 6 for strength |
| Trap (hex) bar | More quads, less lower back demand | Learning to lift from the floor, or managing a cranky back | 3 to 10 |
| Romanian (RDL) | Hamstrings and glutes through a long stretch | Building muscle and a better hinge pattern | 6 to 12 |
| Block or rack pull | Lockout, upper back, grip | Heavy overload with less range, or working around a sticking point | 3 to 6 |
| Deficit pull | Off-the-floor strength | Slow off the floor and already solid at your setup | 3 to 6 |
Sources: Piper and Waller, Strength and Conditioning Journal (2001); Holmes, ACSM's Health & Fitness Journal (2020); and Westside Barbell. Westside's rule of thumb is a good one: pull your strongest style as your main lift, and keep the other style in your accessories.
Hard isn't harmful: deadlifting and your back
Back pain is common, usually settles within a few weeks, and rarely means something is damaged. For most people, staying active and loading back up gradually beats resting it out. Here's what the evidence says, and how we handle it on the floor.
What the research says:
- Most back pain isn't serious. Australia's Low Back Pain Clinical Care Standard notes that more than 95% of cases have no serious underlying cause, and that active approaches work better than bed rest. Scans usually aren't needed.
- A bit of rounding isn't a death sentence. A 2020 systematic review by Curtin University researchers found low-quality evidence that more lower-back flexion during lifting was not a risk factor for back pain. We still coach a flat back, because it's the strongest and most repeatable position, not because one rounded rep will hurt you.
- Deadlifts can be part of the fix. In a Swedish trial, supervised deadlift training reduced pain and improved activity for most people with recurring mechanical back pain. A follow-up analysis found people with high pain levels and poor back endurance at the start did worse, so they need a gentler on-ramp.
Our traffic-light rule for training with a niggle:
| Pain during or after | What it means | What we do |
|---|---|---|
| 0 to 3 out of 10, gone by next morning | Green: hard, not harmful | Keep training. Progress as planned |
| 4 to 5 out of 10, or lingering next day | Amber: back off, don't stop | Lighter load, shorter range, or swap variation |
| Above 5, sharp, or worse each session | Red: stop and tell your coach | Pull it from the program and get assessed |
Modify, don't cancel. Swaps we use include trap bar pulls, RDLs from blocks, rack pulls, slower tempo, or kettlebell deadlifts to a box. You keep training the pattern at a level your back is happy with.
See a GP or physio promptly if you have: pain after a fall or impact, pins and needles or weakness running down a leg, fever or feeling unwell with back pain, unexplained weight loss, or pain that's bad at night no matter how you lie. Numbness around the groin or backside, or new bladder or bowel changes, is an emergency: go to ED.
We're coaches, not clinicians. If you're unsure, get it checked, then bring the plan in and we'll build your training around it.
How we coach it at Accelerate Strength
In every class with a deadlift, your coach checks the same three things before the weight goes up: bar over mid-foot, shins to the bar, slack out and braced. Same cues, same words, every coach, so you're never relearning the lift.
What that looks like in practice:
- New to deadlifting? You'll start with a kettlebell or trap bar, earn the barbell, and build load over weeks, not sessions.
- Experienced lifter? We'll film you side-on, find your fault, and pick the variation and rep range that moves your numbers.
- Carrying a niggle? Tell us before class. We'll modify the lift, not send you home.
Get the free Deadlift Setup Playbook. A 15-page guide with the three checks, printable cue cards, a fault finder, a variation selector, and our back-friendly progression plan. Download the playbook.
Training in Balmain or Rozelle and want someone to watch your pull? Book a free class and bring your questions.
Deadlift setup FAQs
How far should the bar be from my shins before I deadlift?
About 2 to 5 cm, roughly over your shoelaces, so the bar sits over the middle of your foot. Your shins come forward to touch it once your hands are on the bar.
Is it bad if my back rounds a little when I deadlift?
The research hasn't shown that a rounded lower back during lifting causes back pain on its own, though the quality of that evidence is low. We still coach a flat back because it's the strongest and most repeatable position, and we lighten the load if your position keeps slipping.
Should beginners deadlift?
Yes, with coaching. Most beginners start with a kettlebell or trap bar to learn the hinge, then move to the barbell once the three setup checks are consistent.
Conventional or sumo: which is better?
Neither is better overall. Pick the style that lets you hold good positions and move the bar fastest. Longer arms often suit conventional, shorter arms often suit sumo, and the other style makes a good accessory.
Can I deadlift with lower back pain?
Often, yes, with changes. Use the traffic-light rule above, choose a variation that stays green, and see a GP or physio first if you have any of the red flags listed.
About the author
Quinton Smit is the owner and head coach of Accelerate Strength in Rozelle, with more than 15 years in sport science, strength and conditioning and CrossFit coaching. His job is translating the research into what you actually do on the gym floor.
References and further reading
- Nuckols G. How to deadlift: the definitive guide. Stronger by Science.
- Mehdi. How to deadlift with proper form. StrongLifts.
- Starr B. Deadlifts aren't just for powerlifters. Starting Strength, 2011.
- Piper TJ, Waller MA. Variations of the deadlift. Strength Cond J. 2001;23(3):66-73.
- Holmes CJ. Understanding the deadlift and its variations. ACSM's Health Fit J. 2020;24(3).
- Saraceni N, et al. To flex or not to flex? J Orthop Sports Phys Ther. 2020;50(3):121-130.
- Aasa B, et al. Low-load motor control vs a high-load lifting exercise for low back pain. J Orthop Sports Phys Ther. 2015;45(2):77-85.
- Berglund L, et al. Which patients with low back pain benefit from deadlift training? J Strength Cond Res. 2015;29(7):1803-1811.
- Australian Commission on Safety and Quality in Health Care. Low Back Pain Clinical Care Standard. 2022.
This article is general education, not medical advice. If you have pain, get assessed by a qualified health professional.